Monitoring your Centreon MAP server after installation
Centreon provides a plugin pack and a plugin to monitor your Centreon MAP server.
Installing the plugins
Use SSH to access the poller that will be monitoring your Centreon MAP server. Install all the required plugins with the following commands:
# yum install centreon-pack-operatingsystems-linux-snmp
# yum install centreon-pack-applications-monitoring-centreon-map4-jmx
# yum install centreon-pack-applications-webservers-tomcat-jmx

# yum install centreon-plugin-Operatingsystems-Linux-Snmp
# yum install centreon-plugin-Applications-Monitoring-Centreon-Map4-Jmx
# yum install centreon-plugin-Applications-Webservers-Tomcat-Jmx

## OPTIONAL - Only if you have a local MySQL DB for your Map server

# yum install centreon-pack-applications-databases-mysql
# yum install centreon-plugin-Applications-Databases-Mysql
Configure Jolokia
You need to deploy a Jolokia WAR agent on your Tomcat to monitor it.
Download Jolokia and install it on your Centreon MAP server. The agent can be found here.
Or you can use the following command:
# wget http://search.maven.org/remotecontent?filepath=org/jolokia/jolokia-war/1.3.5/jolokia-war-1.3.5.war -O /var/lib/tomcat/webapps/jolokia.war
Warning
Adapt the download URL according to the current Jolokia version.
Configure your database
Access your MySQL server where the Centreon MAP database is stored (the Centreon MAP database is called ‘centreon_studio’ by default).
Run the following commands:
# mysql centreon_studio
# GRANT SELECT ON centreon_studio.* TO 'centreon_map'@'<POLLER_IP>' identified by 'PASSWORD';
Replace ‘centreon_studio’ by the DB name of your Centreon MAP server.
Replace <POLLER_IP> by the IP address of the poller which will be monitoring your DB.
Replace ‘PASSWORD’ by any password you prefer.
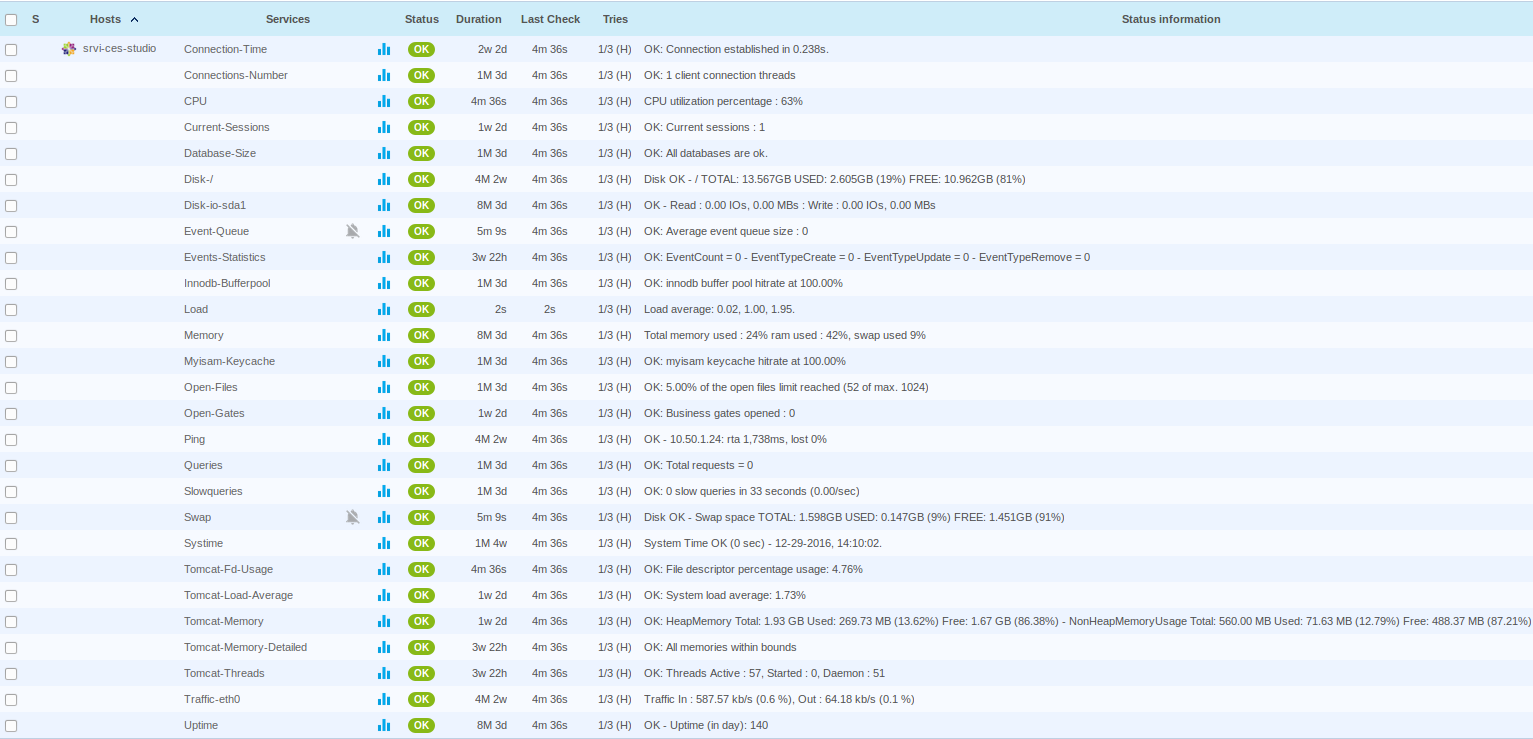
Configure your services
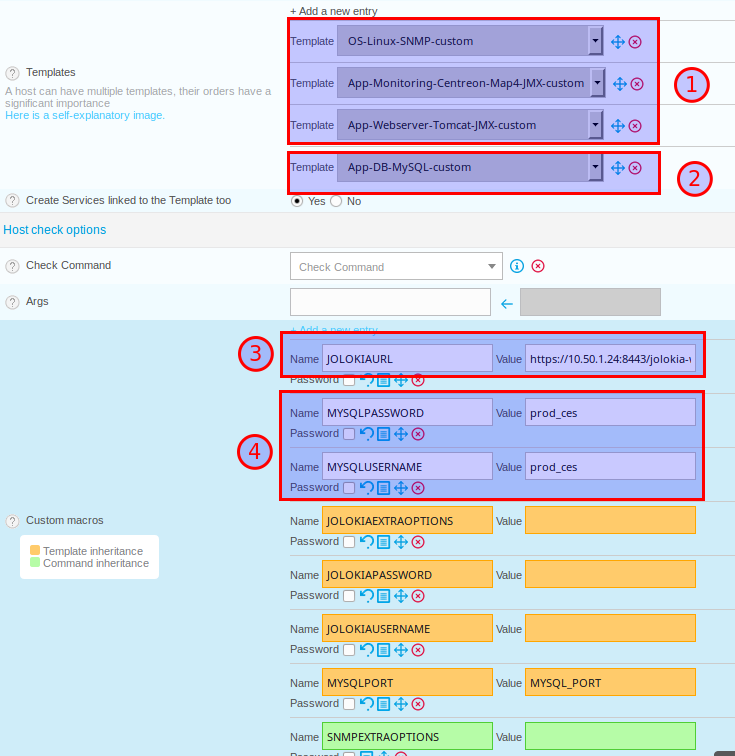
Access your Centreon Web interface. Go to Configuration > Host > Add.
Fill in the basic information about your host and add the following host templates:
OS-Linux-SNMP-custom
App-Monitoring-Centreon-Map4-JMX-custom
App-Webserver-Tomcat-JMX-custom
Also add the following only if you have a local MySQL DB on you Map server:
App-DB-MySQL-custom
Important:
The above host templates are the three main templates required for monitoring your Centreon MAP server.
The MySQL template is useful only if there is a MySQL server on your Centreon MAP server (for Centreon MAP database).
Enter the Jolokia URL as follows:
For an HTTP configuration
http://<MAP_IP>:8080/jolokia
For an HTTPS configuration
https://<MAP_IP>:8443/jolokia
Note
Replace <MAP_IP> by the IP address of your Centreon MAP server.
If you have installed a MySQL server on your Centreon MAP server, enter the user/password you used in Configure your database.
Note
Remember to check the “Create Services linked to the Template too” checkbox.
You can now export your configuration, and your Centreon MAP server will be monitored.